Sunday, August 23, 2009

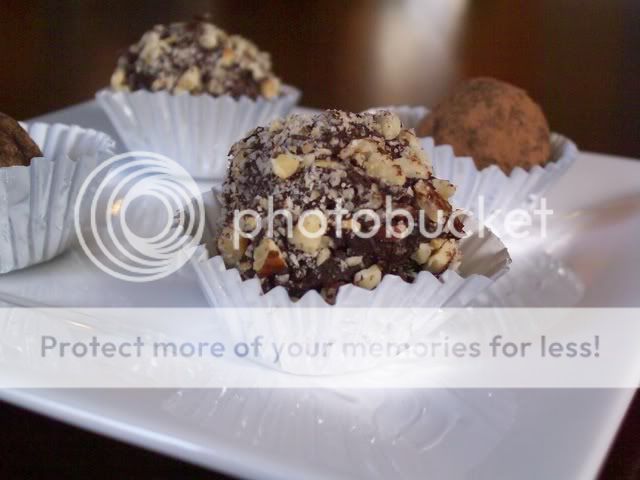
It's Easy to Make Your Own Chocolate Truffles...


Ingredients:

8 oz heavy cream
16 oz good quality dark chocolate
optional: nuts, cocoa, liquor of your choice

*note, this is a fairly large recipe, it will make several dozen. You can halve the recipe if you wish.

Directions:

Chocolate truffles are by far the easiest type of gourmet chocolate to make at home because you don't need to temper any of the chocolate. All you need to do is make ganache, cool it to a thick consistency, scoop small amounts of it with a spoon and roll it into balls and then roll them in the coating of your choice (nuts, cocoa powder, etc).

To make ganache:

You will need a 2:1 ratio of chocolate to heavy cream. For example, if you have a 1 lb bar of chocolate, you need 8 oz (1 cup) of heavy cream,
which is roughly half of a pint.
If your ganache separates (looks globby and oily), it is easy to correct. Just add a small amount of whole milk and stir and keep doing this until it is smooth. Ganache can be kept in the refrigerator for months. Keep your leftovers!

Slice the chocolate on a cutting board with a serrated knife in a straight downward motion in thin slices (approx 1/4 inch). The thinner the slivers of chocolate, the sooner it will melt.
Then boil the heavy cream in a saucepan. Turn off the heat and stir in the chocolate. It will be a consistency similar to thin frosting. That's ok, simply allow it to cool in the refrigerator, checking every 5-10 mins. When it is a little less firm than cookie dough, you are ready to make your truffles. If it gets too hard, no problem! You can just reheat it on low power in the microwave until it is the proper consistency.

*When your ganache is still soft, you can add a flavoring. Liquors work well.
Some tasty liquors are Frangelico, Amaretto, Kahlua, Framboise, Triple Sec, and Rum.
You can also use extracts, such as mint or almond. Literally any flavor that pairs well with chocolate will do! Keep adding as much as you want until you achieve your desired flavor.

For coating, I recommend processing nuts in a food processor then toasting them in the toaster oven or in a dry skillet. For the truffles pictured above, I used hazelnuts and then toasted them.
Cocoa powder makes a lovely coating if you sift it. Place your coatings in flat-bottomed dishes.
So there you have it!

Step 1. Make ganache and flavor it with desired flavoring
Step 2. Chill it to scoopable consistency
Step 3. Scoop into small balls and roll in dish of nut or cocoa powder coating.
Step 4. Place on trays to set.
Step 5. Eat and enjoy! Give to your friends!


Wednesday, August 19, 2009

Peanut Brittle


I got this recipe from my friend Melissa. It's made in the microwave and I think the cleanup was fairly easy compared to making it on the stove top. It tastes just as good too. The nuts will get slightly toasted in the microwave, so the flavor is spot on.
I've also made batches adding a little bit of chipotle chile powder or cinnamon. Either of those spices work well.


Ingredients:

1 c granulated sugar
1/2 c light corn syrup
1 cup dry roasted peanuts
1 tsp vanilla
1 tsp butter
1 tsp baking soda


Combine 1 cup granulated sugar with 1/2 cup light corn syrup and microwave on high for 3-4 minutes.

Add 1 cup of nuts, mix (although it'll be super hard to mix well), and microwave for 2 minutes. If your microwave is strong, keep an eye on it to make sure the nuts don't scorch.

Add 1 tsp vanilla and 1 tsp butter, mix and microwave 2 minutes.

Add 1 tsp of baking soda and stir well. It gets all foamy at this point but just stir until it settles down.

Spread immediately onto parchment paper, flattening with a spatula or knife to about 1/2 inch thickness. Let cool completely and then break up to serve.

Wednesday, July 8, 2009

Peanut Butter Fudge Brownies


Ingredients:

Peanut Butter Swirl...

1/2 c. chunky peanut butter
1/4 c. brown sugar
4 oz cream cheese
1 egg

Beat ingredients together at medium speed until combined. Set aside.


Brownie Batter (From Baking Illustrated)...

5 oz semisweet chocolate, chopped
2 oz unsweetened chocolate, chopped
1 stick of butter, cut into 4 pieces
3 Tbsp cocoa powder
3 large eggs
1 1/4 c granulated sugar
2 tsp vanilla extract
1/2 tsp salt
1 cup flour

Directions:
Preheat oven to 350. Spray an 8 x 8" pan w/ cooking spray, line with tin foil sprayed again if desired for ease of removal after baking.
Melt chocolate and butter over a double boiler until smooth then whisk in cocoa. Set aside to cool to luke warm.
In a large bowl, whisk together the eggs, sugar, salt and vanilla.
Whisk in the chocolate mixture. Fold the flour in with a wooden spoon or spatula. Pour into prepared pan. Drop medium sized spoonfulls of peanut butter mixture in rows across the top of the batter and slice through vertically and horizontally with a knife.
Bake for 35 to 40 mins .

The peanut butter filling is based on a recipe from Gourmet but I didn't use the butter called for in their recipe, just cream cheese. I was using Jif, which has added hydrogenated oil so I figured I could get away without the extra butter and it turned out perfectly.

Sunday, June 7, 2009

Strawberry Kirsch Cake

This is a white vanilla cake, 2 layers torted to made 4, soaked in Kirsch simple syrup, then layered with Kirsh italian meringue buttercream and sliced fresh strawberries. I made it for my friend's 30th birthday. It was not without drama though... I learned that defrosting buttercream in a bowl directly over a flame on the stove is actually a big mistake if you are a novice like me. I read it in a book. Oops ;)

I had mu
ch better luck leaving the frozen buttercream out to soften on the counter for about 15 mins then zapping it on the lowest power in the microwave for 20 seconds then stirring until it was soft enough to spread.

A great recipe for IMBC can be found here.
It's enough to max out a 5 qt stand mixer and it yields about 5 cups.

Tuesday, May 5, 2009

Meringue Class

I took a class on making meringue. It was a blast! I made these mini Baked Alaskas. Of course mine are the messy ones, and the pretty one in the back was made by our instructor. My favorite part: toasting the meringue with the torch at the very end. Our instructor shared with me a very important piece of advice: go to Home Depot to buy a welders torch w/ propane because they are a fraction of the price of the torches sold in kitchen specialty stores. Uh-oh... I shared the secret... the Williams-Sonoma police are going to arrest me!


Here are lovely examples of what my classmates made:


(Hazelnut Dacquoise with Lemon Cream and Berries)

Cookies from The Gourmet Cookbook by Ruth Reichl


Starting from the top, clockwise: Mexican Chocolate (not from Gourmet-- that's actually a recipe I sort of invented, you can find it here), Tiny Chocolate Chip Cookies, Brown Sugar-Ginger Crisps, and lastly Anise-Scented Fig and Date Swirls.

The Tiny Chocolate Chip Cookies Recipe was (not surprisingly) very easy to make. These little babies are suuuuuper tasty. Tastier than regular chocolate chip cookies... I think it has something to do with the extra saltiness. I love, love, LOVE this recipe. I dream about a cereal bowl full of these cookies and a pint of 2% milk. Does "Cookie Crisp" ring a bell? Well this is that stuff... but, you know, ten billion times better!

The Brown Sugar-Ginger Crisps were also easy to make. I can think of several different flavors of sorbet and ice cream that I would like to see these cookies on top of: lemon, lime, honey, cinnamon, chocolate, pear, scallion... ;) Here is the recipe.

The Anise-Scented Fig and Date Swirls were a bit more of a nuisance, shall we say. Any rolled cookie that needs to be sliced at 1/3 of an inch thick is a pain in the rear, I don't care how chilled your dough is. I recommend using dental floss, as you would with cinnamon rolls. Do this as quickly as your can. I'm sure there is a better way of doing it but I'm an amateur, and this way worked really well for me. Any suggestions for technique are greatly appreciated! Also, I don't recommend wrapping the dough in wax paper to roll. I actually had better luck with plastic wrap, rolling on a granite counter top. The wax paper tore as I rolled the dough and I was not a happy camper. But these cookies look cool and they taste great too, kind of like a sophisticated Fig Newton.

Wednesday, April 8, 2009

All Star Birthday Cake

Kate's Birthday Cake:


Devils Food with Mocha Buttercream frosting and fondant decorations... what I learned from this experience: mixing luster dust with vodka to paint on bow pieces looks REALLY MESSY... hence why you don't see shiny gold bow pieces on this cake. My new obsession: buying an airbrush for cake!!


dum da da daaaaaaaaaaaa...the presentation!


now... will someone buy me an airbrush for MY birthday? :)