Friday, March 18, 2011

Making Biscotti...


This is by far the best biscotti recipe I've ever tried. Known traditionally as "Biscotti di Prato" from Tuscany, they contain almonds. But you can use the same dough and add other ingredients, like hazelnuts, orange or lemon zest, toasted anise seeds, cardamom, cinnamon, dip them in chocolate, etc. This recipe makes a lot (about 4 doz) but they freeze well.

Biscotti di Prato

3 3/4 c flour
pinch of salt
1 tsp baking powder
2 1/2 c sugar
4 eggs plus 2 yolks, plus additional 1-2 beaten eggs for egg wash
1 tsp vanilla
1 2/3 cups toasted almonds, chopped


Preheat oven to 350 and line 2 baking sheets with parchment.
Place flour on countertop and make a well. In the center of the well, place all the other ingredients, except for the almonds. Beat the ingredients in the well together with a fork. gradually bringing in the flour. Use your hands when the dough becomes workable. Knead in the almonds.
Form the dough into loaves as pictured and brush with beaten egg.


Bake until golden brown and set, 15-20 mins. Remove from oven, allow to cool slightly and arrange cut side up on baking sheets.


Lower oven temp to 325 and bake again for 10-15 mins.

Monday, January 10, 2011

How to Make Croissants (Part 2)...

After you have rolled the dough, folded it like a business letter and turned it so that the open seam faces to the right like a book, you have completed 1 turn. Repeat this process until you have made a total of 6 turns, wrapping the dough in plastic and chilling it after every 2 turns.
Roll it out into a rectangle approximately 1/4" thick and 16" lon 10" wide. With a bench scraper, cut lengthwise in strips and into triangles:


You can also make filled croissants by filling a rectangle shaped piece of dough with chocolate or grated cheese, etc:

Step 5: Shaping and Proofing Croissants...

To make the traditional shape, start with the wide side of the triangle facing toward you, and roll it upward. Curl the edges into a 'C':


Place the croissants on parchment lined baking sheets, cover with plastic, and proof until nearly tripled in bulk.

Step 6: Baking Croissants...
Brush with dorure (egg wash) and bake at 375 until golden brown, approximately 15 mins.

How to Make Croissants (Part 1)...

Starter:
3/4 cup sifted flour
1 Tablespoon yeast
5-6 Tablespoons warm water (approx 110 degrees F)
2 Tablespoons sugar

Dough:
1 3/4 cups sifted flour
2/3 cups whole milk, warm
1 1/2 tsp salt
1 cup (2 sticks) unsalted butter
dorure (egg yolk glaze) made from 1 egg yolk plus 1 Tablespoon whole milk

Step 1: Make the Starter...

To make the starter, stir together all the starter ingredients to form a small ball of soft dough, then submerge it in a tall container of warm water (110 degrees F). It will sit at the bottom for several minutes. When it pops up to the surface as shown in the second photo, it is ready to use.

Step 2: Continue making the Dough...

In a large bowl, stir together 1 cup of the flour, all of the warm milk and the salt. Scoop the starter dough out of the container of water and add to the bowl. Stir in the remaining 3/4 cup of flour. Crash on the counter top by with the aid of a bench scraper 30 times or so until the dough comes together and is smooth and soft, then flatten it into an 8 inch square, wrap in plastic and chill in refrigerator.


Step 3: Make the Butter Square...
Knead the butter with bare hands, smear it and scrape it with a bench scraper until uniform, shape it into a square, then wrap in plastic and chill.

Step 4: Rolling and Making Turns...

Place the butter square inside the dough diagonally as shown:


Wrap the dough around the butter square and pinch the edges to seal:

Roll the dough into a large rectangle 1/4 inch thick, occasionally lifting the dough with a bench scraper and sprinkling flour underneath to prevent sticking. In areas where butter bursts through, dust with flour. When finished rolling, fold as you would a business letter:
Turn the dough so that the open seam faces to the right just like a book:

Saturday, July 31, 2010

Danish...


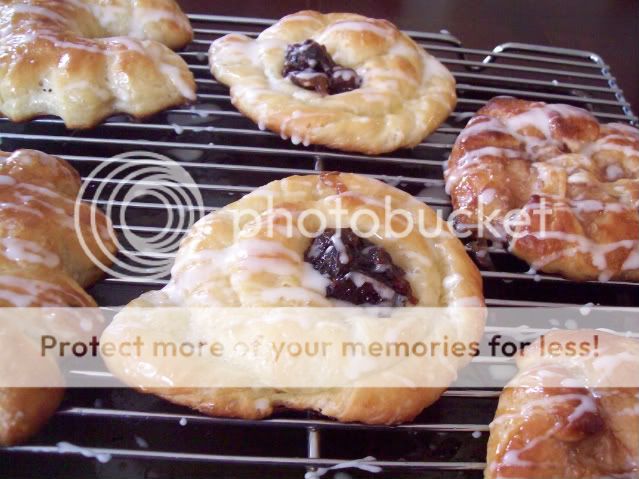
Danish is made with a yeast dough that is spread with butter, rolled out, turned, shaped and filled with cream cheese and jam. After it is proofed and baked, it is immediately brushed with cold sugar syrup, cooled, and drizzled with white icing.

Danish Pastry

Cream Cheese Filling

6 oz cream cheese
2 TBS sugar
1 1/2 TBS flour
1 large egg yolk
1 tsp lemon juice
vanilla extract to taste

Blend all ingredients well.

Cold Sugar Syrup

1/2 cup sugar
1/4 cup water

Place water and sugar in saucepan, bring to a boil and stir to dissolve. Chill in refrigerator.

Butter Dough

1/4 c. all purpose flour
1 1/2 cups unsalted butter, cut into small pieces, softened

Place flour on counter top and work in the butter with your fingertips. Fraisage the dough with the heel of your hand until a dough is formed.

Yeast Dough

2 TBS dry yeast
1/3 cup of warm water (110 degrees F)
1 cup lukewarm whole milk
2 large eggs at room temp
1/4 cup sugar
1/2 tsp cardamom
1 3/4 tsp salt
3 1/2 - 4 cups all purpose flour

Preheat oven to 375

In a large bowl, combine yeast and water with a pinch of sugar. Let sit for 5 mins until foamy. Stir in milk, eggs, sugar, cardamom and salt. Mix well to combine. Add flour gradually, beating with a wooden spoon until smooth and shiny. Turn onto a floured surface and work the dough lightly to bring it together. Roll into a 14 inch rectangle and fold into thirds as you would a business letter (this completes your first turn). Wrap in plastic and chill for approximately 20 minutes. Roll it into a rectangle again, fold and chill. Repeat this process 2 more times for a total of 4 turns, chilling the dough after every 1 to 2 turns as necessary to keep it from getting too soft. Return it to the refrigerator for 30 minutes. Roll it into a large square 1/4 inch thick. Cut it with a bench scraper and shape it as desired. Below are examples of shapes with cream cheese filling plus jam in them:


-- Make a small square ( approx 3 inch x 3 inch), top with cream cheese then jam, pinch two corners inward.


--Make a long snake, (approx 9 to 10 inches), roll into a coil shape, top with cream cheese filling and jam.


--Bearclaw: cut a rectangle approximately 4 inches wide, 8 inches long. Put filling in the middle and fold it over. Make cuts as shown.

--Curve it when placing it on the baking sheet as shown.


After you have shaped the danish and placed it on a baking sheet covered with parchment, place plastic wrap over the danish and allow it to proof until doubled in size. Brush with dorure (1 egg beaten with a splash of milk or water), and bake for 10-15 minutes or until golden brown. Immediately brush with cold sugar syrup. Allow to cool, and drizzle with icing.

White Almond Icing

1 1/2 cups confectioners sugar, sifted
1 1/2 TBS whole milk
1/2 tsp almond extract
1 TBS rum

Whisk all ingredients until smooth. Add more milk or sugar to achieve a runny consistency.
Dip your fingers in the icing and drizzle across the pastry in a fast back-and-forth motion.


Saturday, May 22, 2010

Pate a Choux: Easy as "4,1,1,4"


Pate a Choux is the name of the dough used to make cream puffs, eclairs, gougeres, and a number of other sweet and savory pastries. It literally translates "cabbage paste" because a baked puff looks like a tiny cabbage. People also call it as "choux paste"
"4,1,1,4" refers to the recipe I recently learned in culinary school. Just remember this number code and you will have a pate a choux recipe embedded in your brain forever:

  • 4 ounces butter
  • 1 cup water
  • 1 cup flour
  • 4 eggs
  • 3/4 tsp salt, for taste
...don't forget the salt, which isn't in the code. You would still be successful if you left it out, it just wouldn't taste as good.
To make the choux paste, cut the butter into small pieces (about 1/2 TBS in size or smaller), and put the butter with the water in a medium saucepan over low heat. Bring it to a boil. *note: you do not want your water to start boiling before the butter melts because too much liquid will evaporate. That's why you cut the butter into small pieces and keep the heat low.*
Meanwhile, beat the eggs with a fork to break them up. Mix the salt and flour together.
When the water comes to a boil, dump the flour and salt in the stir with a wooden spoon until well-blended and resembles mashed potatoes. A lot of steam will come out. This is a good thing, because you want the paste to "dry out." Continue to stir the paste over low heat, until it gets shiny, more yellow in color, and smells like butter. These are your clues that the paste has dried out sufficiently enough to proceed with the next step.
Remove the saucepan from the heat and dump the paste into a large bowl. Allow to cool for a few minutes until just warm to the touch.
Stir in the beaten eggs with a wooden spoon, one at a time until each is absorbed in the paste. Test it by sticking the wooden spoon straight up and down in the center of the mound of paste. The spoon should start to fall over. If not, then there is not enough liquid. You may add a 5th beaten egg to achieve the desired consistency.
The paste will keep for 3-4 hours at room temperature.

Next steps...piping out the pate a choux...


The above picture shows pate a choux piped to form cream puffs. Use a large plain tip on your pastry bag to pipe out approximately 1.5" diameter circles. If they have points on top of them, simply smear them off with the tip of your finger after you wet it with some water. Be careful about how closely you space them, because they will double in size.

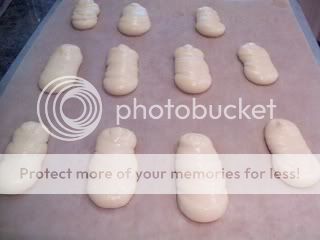
To form eclairs, pipe 2-3" long lines as shown below, with the large plain tip:


Mine are not all that tidy, but basically the idea is to make them oblong.
You can score them with a fork to make lines (not shown), and they look better this way.
Brush them lightly with egg wash before baking, and mop up any excess egg wash with a bit of paper towel.

Baking...


This is critical. The oven needs to be VERY HOT (475 F) during the initial stage of baking and YOU SHOULD NOT OPEN THE OVEN for at least 20-25 mins or until they have puffed and begun to firm up and are golden brown. After that, you can lower the oven to 325 and allow them to dry out this way for 10-20 more minutes.
Remove them from the oven and allow them to cool on a cooling rack before filling.
The inside of your pate a choux pastries should have a lot of air bubbles and have a light and fluffy consistency. The eclair shells below are an example of the correct texture:


Cream puffs and eclairs are filled with pastry cream. Below is an example of a savory puff, filled with herbs, cream cheese, and olives:


For savory puffs, you can ingredients such as add fresh herbs and parmesan cheese to the raw choux paste. The possibilities are limitless.

Here is the recipe for pastry cream to make cream puffs and eclairs:

Pastry Cream
1 1/2 cups half-and-half
4 large egg yolks
1/2 cup sugar
1/3 cup flour
pinch of salt
1 tsp vanilla
1/2 cup heavy cream

Heat the hald-and-half in a saucepan until just warm and steaming. In a separate bowl, whisk the egg yolks and sugar together to the ribbon stage. Stir in the flour and the salt.
Gradually whisk in the half-and-half. Transfer the mixture to a saucepan and cook over medium heat, stirring constantly with a wooden spoon until it becomes very thick. Be sure to whisk out any lumps.
Remove from the heat, add vanilla, and strain with a single mesh strainer into a bowl. Place plastic wrap directly on the surface of the pastry cream. Refrigerate until it just begins to cool.
Whip the 1/2 cup heavy cream to the soft plop stage. Fold about a quarter of it into the pastry cream to lighten it. Continue to fold in the rest of the whipped cream. Cover with plastic again and refrigerate until firm. Pipe as needed in cream puffs and eclairs.

For Coffee Flavored Pastry Cream:

Add 1 TBS instant coffee granules to the warm half-and-half at the beginning of the recipe.

For Chocolate Flavored Pastry Cream:

Stir 4 ounces finely chopped semisweet or bittersweet chocolate into the warm strained pastry cream.

To make chocolate glaze:

Melt 4 ounces of finely chopped chocolate in a double boiler or microwave. Add 1 tsp vegetable shortening, stir and allow to cool to desired consistency before applying.

Sunday, May 9, 2010

Mushrooms...

You can peel a portabella mushroom to give it a cleaner appearance:


This is desirable for use in recipes because it makes the mushrooms look better and it also removes any dirt clinging to the surface of the mushroom.
To remove the gills, scrape the underside of the mushroom with a spoon. This is an important step, because the gills are very dark brown and they will destroy the visual appeal of your dish if you leave them on the mushrooms.


I was using portobello mushrooms in a recipe for Hungarian Mushroom Soup that I got in culinary school.
The recipe is as follows:

1/2 c. dried porcini mushrooms (.5 ounces), soaked in warm water
1 cup onion, diced
1 Tb garlic, chopped
4 Tb butter
1 lb portabella mushroom caps, gills removed and diced
1 Tb Hungarian Paprika
4 Tb flour
4 c. chicken stock
1/2 cup parsley, chopped
salt and freshly ground pepper
1 cup sour cream or creme fraiche as garnish

1. Scoop the porcini out of the water and chop. Strain the liquid through a cheese to remove the grit cloth and retain the liquid.

2. In a saucepan, melt the butter and saute the onions in it until translucent and then add the garlic. Continue to cook until softened.

3. Add portobellos and porcini. Season with salt. Saute until the portobellos give off liquid.

4. Stir in the paprika and flour and toast it for a minute over the heat. Pour in half of the stock and simmer until thickened and smooth. Pour in the remaining stock and porcini mushroom liquid. Simmer 20-30 minutes or until it reaches the desired consistency and add chopped parsley. Season with salt and pepper to taste. Serve with a dollop of sour cream or creme fraiche.


People in the culinary world used to think that you should never wash mushrooms before use, because they act as sponges and soak up a lot of water which could then affect the recipe. But now we know this is not true. Also, typical mushrooms used for culinary applications are not grown in manure, so you can put to rest any fears you have about this. See here: The Mushroom Lady

Friday, May 7, 2010

Back from a Blogging Break...

I haven't blogged in a while because I've been undergoing a few life changes: I started a new job and I started you know what...CULINARY SCHOOL. Finally, the time has come. I will learn how to cook using proper technique, etiquette and that certain... je ne sais quoi. (If you want to go to culinary school, be ready to use some French, and pronounce it correctly!)
Recent topics we've covered in class: fruits & spices, vegetables and herbs, knife skills, and the basics of keeping the school kitchen sanitary. (ServSafe Certification comes later).

Before I get too boring, here is an example of a fruit recipe: "Caramelized Pear Crisps" from our Fruits and Spices class

Slice 2 pears thinly using a mandolin and place them on a baking sheet covered with parchment paper (or silpat mat, which I tried later and trust me, this works a lot better). Dust with powdered sugar and bake in the oven at 175 degrees until they are sufficiently dried out, 2-3 hours.
(oh, and baking times go out the window in the professional culinary world. Ask the Chefs teaching at culinary school, and they will tell you, the food is done... when it's done).


Among other recipes made during that class were bananas foster, peach fritters, filled baked apples, fruit compote, guacamole, blueberry cobbler, grilled chicken with spiced kumquat chutney, poached pears, strawberry rhubarb sorbet, fruit and spice granola,passionata smoothie, mango-tomatillo salsa, fried plantains and prosciutto and brie sandwiches with rosemary fig confit. So we traveled across the spectrum of ways to cook fruit, from sweet to savory.
A few random facts about fruit:
  • When cutting and preparing fruits that turn brown, such as apples and pears, place the slices in a solution of lemon juice and water as you go to prevent browning.
  • Freezing fruit works better if there is some sugar in the fruit to protect cell walls against ice crystals (as fruit freezes, the water content expands into ice crystals and breaks cell walls).
  • Melons are in the squash family, except for watermelon.
  • Tropical fruits contain bromelain, which prevents gelatin from congealing, so you need to boil the fruit for all gelatin applications in desserts.
  • An avocado only gets ripe after picking
  • Fruits that never ripen after they are picked are soft berries, cherries, grapes, citrus, watermelon, and pineapples. So be choosy when you are shopping for these items.
Now to talk about spices...
I learned that Mace is actually the outer covering of Nutmeg. (Seems a little obvious, since mace is so similar to nutmeg...)
The shelf life of spices is basically a year. Whole spices last longer than ground spices, so if you are buying spices for your home kitchen, stick with small quantities and purchase whole spices when you can and grind them yourself when ready to use.